Creating a new Report
Ø Create a new report ‘Employee_Details_Groupby’ inside the created folder ‘BI_Publisher_LabGuide’
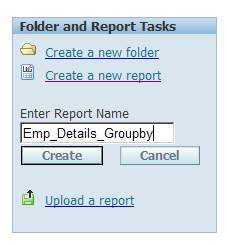
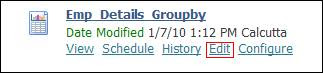
Ø Click on Edit link mentioned below to create the report
Ø Create a new report ‘Employee_Details_Groupby’ inside the created folder ‘BI_Publisher_LabGuide’

Ø Click on Edit link mentioned below to create the report

- Creating a new Data Model
Ø Select Data model à New


Ø Enter the data model name àselect the type as SQL Query
Ø Choose the data sources and click the Query Builder button.
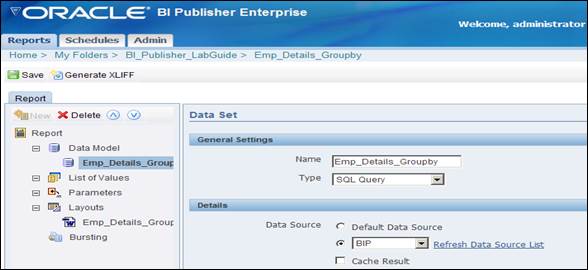
Ø Choose the data sources and click the Query Builder button.

- Creating Query using Query Builder
Ø Select the table ‘EMP’ and ‘DEPT’ and check the required fields.
Ø Define a join between these two tables as follows:
Click the box beside the DEPTNO column in the DEPT table. (See the following screens.)
Similarly click the box beside the DEPTNO column in the EMP table.
These boxes when marked for joins turn to light gray.
Also note that a fine line joining the tables appears in the Model canvas.

Ø Click Conditions, and move the DEPTNO, to appear first in the list (as shown in the screen below).

Ø You can use these icons
 beside each column to move the columns up or down.
Ø View the generated SQL Query and the Results.
Ø This is the result for the generated SQL.

Ø Save the report

- Creating Report Layout using BI Publisher Desktop in MS Word
Ø Create a new template using Microsoft word. (Refer section 4.3 for detailed steps for creating the template)
Ø Navigate and select the Based on Oracle DB report that you have created from My Folders> BI_Publisher_LabGuide. Click Open Report.
Ø Using the table wizard create a template as shown below:

Ø To change the format for the HireDate data field, double click on the field and select the formatting type as Date and format. For example, d-MMM-yy and click OK.

Ø Similarly, to change the format for the Salary, double click on the field and select the Type as Number and Number format to any of the format as needed. For example, $#,##0.00 to display the salary in dollar format and click OK.

Ø Similarly, change the format for commission field and click OK.
Ø Left align the Salary and Commission fields.

Ø Insert header and footer for the created template by selecting the Insert->Header and by selecting Insert->Footer.
Ø The template designed should look like as shown below.

Ø After making the necessary changes, upload the template by selecting Add-Ins->Oracle BI Publisher->Upload Template As

Ø A dialog box opens prompting to save the template in RTF. Click OK.

Ø Save the template in Rich Text Format.

Ø A dialog box pops, asking for the Template name. Enter the Template name. The same name will be displayed in the BI Publisher.

Ø After successfully upload a dialog box pops stating that the template has been added to the report. Click OK.

Ø Check for the uploaded template in the BI Publisher Report.

Ø Save the report and view the output. You can see the template name as the name uploaded from MS Word. View the output in different format.

Ø This is the report that is generated in HTML Format.

Comments
Post a Comment